Automation is key in the Enterprise – from Software Development Lifecycle (SDLC) automation such as DevOps, to business process automation such as Robotic Process Automation (RPA). But what about automation for the Consumer?
Workflow Automation is nothing new on iOS – one of the most popular workflow apps of 2016/17 was an app named ‘Workflow‘. In fact, it was so popular that Workflow was purchased by Apple in 2017 for an undisclosed amount.
The app was re-branded as Apple Shortcuts and may be one of those Apple Apps that you file away in an ‘Apple’ folder and never touch. But hopefully by the end of this article, you will not only understand the architecture behind Apple Shortcuts, but having been taken through the development of a real-world shortcut (integrating with Trello), you will have the knowledge to dive straight in and start creating your own shortcuts. Whilst this article focuses on iOS, Android has a similar offering, Google Action Blocks.
What is (was) Workflow?
As with any Operating System (OS) environment, frameworks are provided to developers to enable them to complete common tasks. For example, on OS may provide frameworks to allow developers to record audio, manipulate an image, or send a text message. As an iOS Developer, you’ll often integrate with these frameworks provided by Apple. Fundamentally, these frameworks expose functions that can be combined together into a workflow (a sort of simple app) in a dynamic way (i.e. they don’t require the user to create an app and release via the App Store). This was the idea behind Workflow and is shown below:
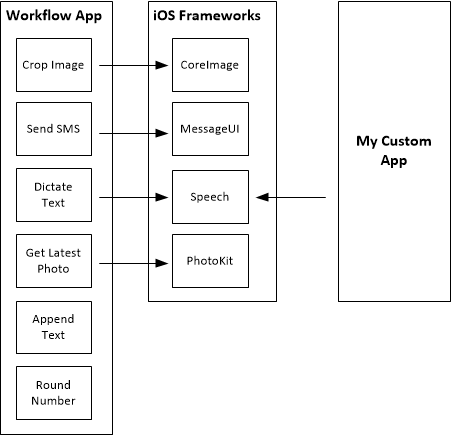
Workflow essentially exposed wrappers around these common functions (and created some of their own reusable actions that do not use underlying Apple frameworks – such as handling variables, rounding numbers, etc.). Through a slick UI, the app allows users to combine these actions together to create a workflow, passing the output of actions as the input to subsequent actions.
For example, you may have a workflow that gets all photos taken today from the users camera roll and creates a pre-populated text to send to your family with the images attached. Prior to Workflow, this could not be automated with out of the box iOS functionality. But with Workflow, this is possible and opens up a whole new genre of apps, or more generally, consumer automation opportunities.
It’s obvious to see why Apple decided to make such an acquisition, especially when you see how they’ve integrated it into the Siri ecosystem over time, as the following section explains.
Apple Shortcuts (Intent Framework)
It’s great that the Workflow developers could write ‘wrappers’ around iOS frameworks and expose them to users in the Workflow app, but what about integrating with other applications on the App Store? They don’t come as iOS frameworks, but they contain useful actions we may want to combine into a workflow. We also don’t want the developers who work on the now Shortcuts app having to write a wrapper around every possible application out there to enable it to be combined into a Shortcut workflow. The answer is a layered architecture.
To a Software Engineer, the concept behind Apple Shortcuts makes complete sense. Applications consist of a number of functions (or Actions as Shortcuts refers to them) – you book taxis on the Uber app, order drinks on Starbucks App, post pictures on the Instagram app, etc. As a Software Engineer, we see this as a layered architecture consisting of Presentation, Application, and Data layers. The Application Layer consists of business logic that can be reused across a number of presentation technologies (GUI, voice, workflow, etc.). This is the concept behind Apple Shortcuts, whilst Starbucks allows you to order a coffee via their App, you can also set up an Apple Shortcut that will order you a coffee from Starbucks as soon as you leave the house, without you ever having to open your phone.
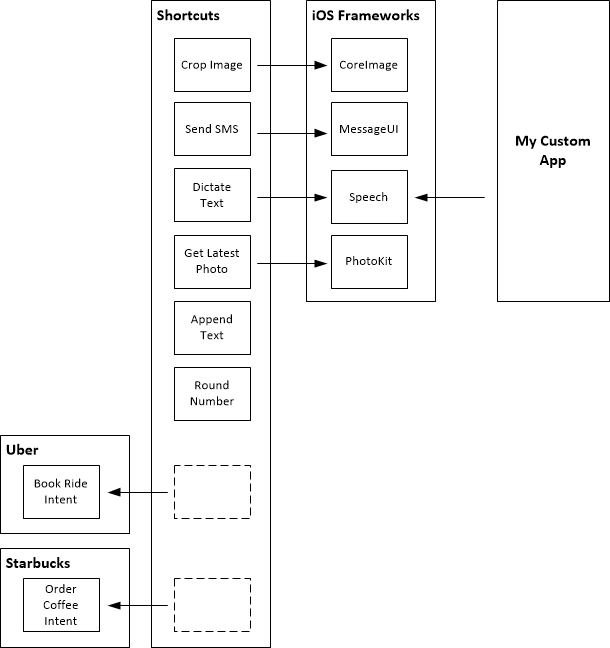
The way in which Apple allow apps to expose reusable ‘Actions’ is via the Intent Framework; the framework originated to provide Siri with a way of interacting with applications (i.e. get the latest headlines from the BBC News App). This architecture can be seen below:
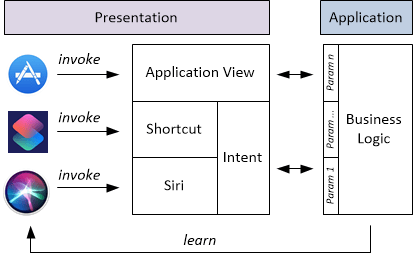
The Application (Business) and Presentation Layers are explained below:
- Business Logic (Application Layer) – regardless of the way the user interacts with the application, the goal of the user is the same – this is the business logic of the application. For example, the goal of a user interacting with Uber is mostly to book a taxi. In order to do this, a number of parameters must be specified, such as:
- Pickup location
- Destination location
- Type of taxi
- Billing Information
- Application View (Presentation Layer) – this is the Uber App you’re used to interacting with – the interface that allows you to interact with a map to set pickup and destination locations. The Application View passes parameters selected by the user using the User Interface to the Business Logic to book a taxi. Note that the Business Logic does not care how the parameters are retrieved from the user, just that they’re provided. For example, they could also be proved by an Intent.
- Intent (Presentation Layer) – an Intent is another form of user interaction whereby the interaction is not via the ‘App’ but via either Siri or Shortcuts. Much as the UI provides a way for the user to input parameters to invoke some Business Logic, an Intent also collects parameters, passing them onto the reusable Business Logic. Depending on the channel used by the intent however, the approach will vary:
- If using Siri, the user may converse with Siri (through voice, cards, etc.)
- If using Shortcuts, the input parameters may be preset by the Shortcut definition, or the user my be prompted as part of Shortcut execution.
Siri, a Personal Assistant
Shortcuts is integrated even deeper into the Siri ecosystem with a learning path going from business logic execution to the Siri Recommendation Engine. Siri is an Artificial Intelligence (AI) agent – it aims to learn about you to provide a more tailored experience. Run the shortcut ‘Book taxi’ every morning? Siri will learn that you do this Monday – Friday and present you with the ability to run the Shortcut from your lock screen in the mornings, Monday to Friday. This is achieved through the Siri Donation System.
Over the Christmas break, I wanted to learn more about Apple Shortcuts and so came up with my own Shortcut. I run my day-to-day personal and work tasks through Trello – each morning I’ll open the various boards to see what’s due today (and often what’s late!). It would be great if, upon turning off my alarm in the morning, Siri would read out this information to me.
Shortcut Tutorial
Before we get started, it’s important to understand what makes up a Shortcut. In my opinion, a shortcut consists of three ‘structures’:
- Flow Control – if you’re going to create something that executes a series of events, you’re going to need to make some decisions on what to do. That’s where Flow Control comes in; this essentially boils down to if statements and loops – statements that control execution.
- Apps – whilst a Shortcut doesn’t need to interact with Apps on your Apple device, often times it will. Examples include Trello, Google Maps, Starbucks, Photos, Messaging, etc. These actions are exposed via the Intent Framework described above.
- Functions – your Apple Device will expose a number of functions provided by the Operating System, this enables you to do things such as make API calls, perform base-64 encoding and decoding, and parse text.
The above combine to create the “What’s on today?” Trello Shortcut – however, they can be combined in a number of ways. I considered two approaches, starting with Native Trello REST API Integration.
Native Trello REST API Integration
Initially, I wanted to see if an approach to calling REST APIs would be successful; whilst the Workflow developers have already written Actions that call the Trello REST APIs, I was interested to see how easy it would be to integrate via REST myself. How easy would it be to integrate with any REST API out there on the Internet?
REST API calls are made through the Get Contents of URL Action – you provide an endpoint as well as a method, headers, and in the case of POST, PUT and PATCH, an optional request body. The response can then be parsed (particularly if it’s a JSON response), often by sending the response to the Get Dictionary from Input action.
I was also interested to see how complex the responses could be; could I return some audio generated by AWS Polly and returned via Lambda to be played back on the iOS device?
The architecture is outlined below:
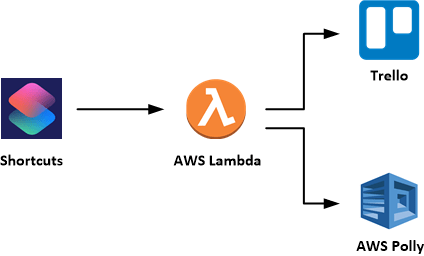
Architecturally, the solution worked. Lambda would make a call to the Trello REST APIs to retrieve cards, formulate the textual response and request AWS Polly to turn it into speech. This audio would then be base64 encoded and returned as the payload. The Shortcut would then decode then base-64 decode the response and send this to the Play Audio action. It has proven to me just how much potential there is to be achieved by Apple Shortcuts.
However, due to poor support for POSTing JSON (essentially serialisation of lists – the list is parsed into a string separated by new line (‘\n’) characters as opposed to an array of objects), I decided to follow the Trello Shortcut Action architecture explained in the next section.
One point of note if you choose to implement this architecture – AWS Lambda has a 6MB restriction on response payloads. If you’re sending the AWS Polly audio file as a base64 encoded string, you may quickly breach this limit. In this instance, you’ll need to use Amazon S3 for delivery of the audio file to the device (i.e. Lambda returns a Presigned URL).
Trello Shortcut Action
Prior to Apple purchasing Workflow, the developers had created a wrapper Action around the Trello REST API that will OAuth (authenticate) with Trello and enable you to query boards, lists, and cards (you can also create Trello items). The response from the Action works perfectly with some of the Flow Control structures in Shortcuts such as the ‘Repeat with Each’ action.
I created the below Shortcut to retrieve items from my Personal Development Board and utilised Siri to verbally tell me what cards are overdue and due today.

The solution works great, however due to restrictions of the Trello Action, it is not possible to dynamically select a list (i.e. to loop through all boards). This prevents you from creating a shortcut that will loop over all cards across all your boards (which I would find useful).
You can download the Shortcut and modify it as you see fit – what additions would you make?
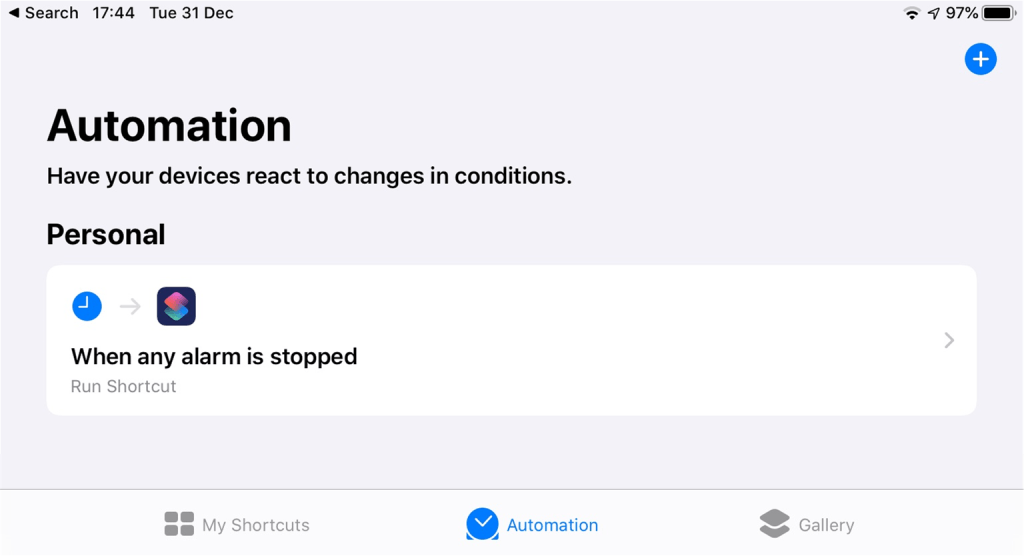
I also wanted to automate the way in which the Shortcut would trigger – one of the enhancements Apple has made to the Workflow app in Shortcuts is the ability to automate the triggering of a Shortcut.
Siri will learn when you use certain shortcuts and can recommend them on your home screen for your to trigger manually; however, shortcuts can also automatically trigger upon location conditions, alarm conditions, and certain device conditions such as a Bluetooth device connecting. For the context of the “What’s on Today” Shortcut, I wanted Siri to read out the things I had to do today when I turned my alarm off. The automation below achieves that.
Future Improvements
In the 2 years Workflow has been under the control of Apple as the Shortcuts app, a number of key improvements have been made – specifically integration with the Intent Framework and support for Automation. Through the creation of the “What’s on Today?” Shortcut, there are a number of improvements I would like to see which are outlined in this section.
Type System Stability
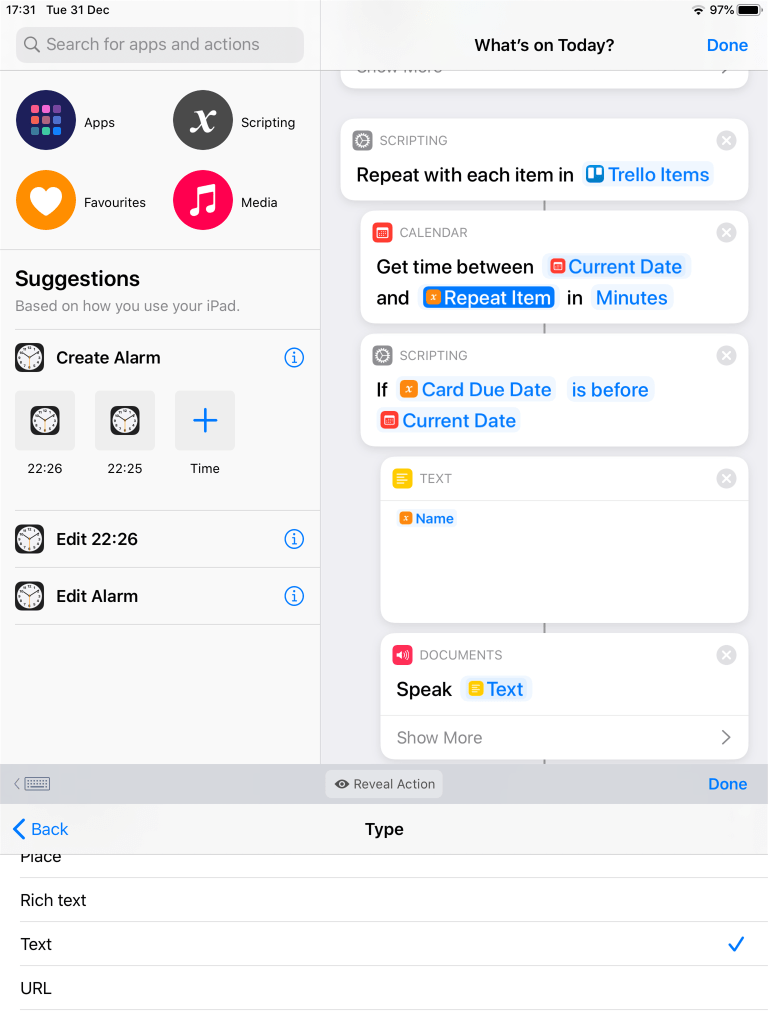
The Type System within Shortcuts is what enables you to retrieve the attributes of objects that are the result of an Action. Unfortunately, actions cannot always correctly determine the type of an input if the action does not come immediately after the action that produced the relevant output.
In the example below, the Repeat and If blocks were added sequentially following Get Trello Items where the type system works correctly. However, above the Repeat block a Speak action was added, making the Get Trello Items and Repeat blocks disjoint. Therefore, when adding the Time Between action, I was unable to correctly set the Repeat Item type to Trello Card and retrieve the Card Due Date. Note how the If block continues to work as it was added at a point in time when the type system work working correctly.
OAuth Support
The majority of REST APIs exposed by third parties support the OAuth Protocol. As a protocol following a standardised set of processes, it makes sense to enable this as a generic Action within Shortcuts – the output of which is an access token that can be used as an input to the Get Contents of URL action.
JSON Handling
Shortcuts handles JSON responses well (i.e. accessing keys returned from an API call in a JSON response), but it’s not easy (tending towards impractical) at all to simply dynamically create a Dictionary data structure and send it in an API request (i.e. a POST). This was highlighted in the creation of the “What’s on Today?” Shortcut – this is a MUST have for Apple in the next release.
“Shortcut Store”
As illustrated through sharing the “What’s on Today?” Shortcut, sharing of shortcuts is not ideal. It makes sense that the Gallery within the Shortcuts app can be used for users to share Shortcuts they’ve created (with ‘Top Downloaded’ boards, etc.). Obviously this will add some rigor to the process (more like the App Store), but I don’t think this is a bad thing (we still want to control the quality of Shortcuts given how easy they can be created).
App Support for Shortcuts
Many apps currently support the Intent Framework to support Siri integration – however, additions are required to enable support for Shortcuts (minor changes to the Intent Definition file). I’d like to see more apps supporting shortcuts so that we can do things such as automate the booking of a taxi (i.e. with the tap of a button, have a taxi be booked from your current location to the hotel you’re staying at that week which Siri automatically shows on my lock screen at 1800 because it has learnt that’s when I use this particular Shortcut).
Apple Framework Support
Every year at WWDC, Apple introduce a wide range of additions to their frameworks. It would be great to see Apple frameworks automatically integrate with the Intent Framework and by inference Shortcuts so that developers of the Shortcuts app do not have to write wrappers each and every time functionality is added (or removed).
Automation Triggers
Shortcuts can be triggered by changes to the iOS device state – for example, arriving at a location or upon connecting to a certain Bluetooth device. It would be great for that to be expanded to include events coming from the battery, receiving notifications, etc.
Closing Thoughts
I’m disappointed in myself that I am only just discovering Apple Shortcuts, and formerly, Workflow. Through writing this blog post, I have learnt so much about a genre of app development that I feel has huge potential.
Consumer Automation is personal – you may want to send a text with your location to a family member when your battery level becomes critical; when you arrive at the train station, you may want your AirPods to output when the next train is due to leave that takes you back home; or you may want your phone to set a reminder when your smartwatch battery is critical. By giving the consumer an easy to understand interface to build their own automation’s, mobile devices can really begin to assist consumers in their day-to-day lives, not just interrupt them.
There are thousands of great services available to consumers that provide real value, however, as with 90% of the work I do for clients, integration adds another level of value. It’s the same for the consumer, by allowing them to chain together actions provided by these individual applications in ways that work for them, easily, everyone wins.